
The page you were trying to view is not available for your role.
What you’ll need to get started
- Ability to place new business under the correct adviser (correct user access)
- Full client detail including National Insurance number if client has not been fully set up
- An illustration needs to be produced before the application is submitted to ensure appropriate pre-sale disclosure
- Fee agreement (if fee is being placed)
Watch time: 6 minutes
How do I
1. From the homepage search for the relevant client.
2. Click on the ‘New business’ button at the top of the screen and select ‘New business application’.
3. Select the product and complete the questions about the advice that’s been given.
4. Enter any remaining client details that have not already been provided. Information entered when initially setting up the client will have pulled through to the application.
5. On the next screen, enter details of any servicing fee that has been agreed with the client and how the investment is going to be funded (regular contributions, single payment (lump sum), or transfer).
- For single payments, if you select ‘Bank Transfer’ we will provide you with our bank details and an application reference. The debit card option will be available for amounts under £100,000.
- For single payments into an ISA, the cheque or bank transfer needs to be for the sum of the net contribution plus the adviser fee. For other product payments, the adviser fee is deducted from the gross amount.
- For a transfer, enter the required transfer information such as the ceding scheme name and account number (excluding CIB).
- For regular payments, you will need to provide the value of the regular payment, the frequency period and the first collection date (excluding CIB).
- The ‘Assumed holdings’ section allows you to include additional platform holdings (excluding this application) and the value of any linked accounts to enable the likely platform charge to be displayed within the illustration.
6. Select the assets to invest in using the ‘Search’ (or ‘Advanced search’) facility to locate them. You can choose model portfolios, discretionary fund manager portfolios, funds, or exchange traded instruments.
- Enter the asset allocation percentage split amongst the selected assets, including any cash holdings, and ensure the total equals 100%.
- Once you’ve entered the asset allocation, a risk score between 1 and 10 will be generated. There are however some exceptions and in some cases a risk score will not be generated.
- Confirm what you’d like to happen to any distributions received from the assets.
7. The next screen allows you to review the information you have entered.
- Use the ‘Edit’ options to make any amendments.
8. Supporting documentation will be generated. These documents contain important pre-sale disclosure information for you to discuss with your client. You can consolidate the documentation into one file by selecting the documents you require and clicking the ‘Consolidate’ button.
9. Review the information, tick the declarations and click ‘Submit application’.
- The green banner at the top of the screen confirms your new business application has been submitted.
10. If you’ve chosen debit card as the payment method, continue to the payment stage by clicking ‘Proceed to payment’. You can choose to do this later from the client’s dashboard, however any delay will hold up the application.
Important Note: Please ensure that any lives assured you wish to add to the bond, have been created as individual clients before starting the application.
Tip: when you have created your lives assured, use the ‘Star’ icon to add them to your quick list, to make searching for them later, much quicker.
1. From the homepage search for the relevant client.
2. Click on the ‘New business’ button at the top of the screen and select ‘New business application’.
3. Select the Collective Investment Bond and complete the questions about the advice that’s been given and click next.
4. Enter any remaining client details that have not already been provided. Information entered when initially setting up the client will have pulled through to the application.
- Confirm if your client wishes to apply “Capital Protected Death Benefit” to the bond.
- Add your lives assured at this stage by searching for them, or by using the quick list if you have added them previously.
- Choose the Relationship between the life assured and the bond holder from the drop down list.
- Click next
5. On the next screen, enter details of any servicing fee that has been agreed with the client and how the investment is going to be funded (Client and/or Third Party Payment).
- If you intend phasing the investment into the assets, please select here and choose the period to phase over and the start date for the phasing, noting that phasing takes place on the 1st of each month
- Enter the initial fee you have agreed with your client.
- The ‘Assumed holdings’ section allows you to include additional platform holdings (excluding this application) and the value of any linked accounts to enable the likely platform charge to be displayed within the illustration.
6. Select the assets to invest in using the ‘Search’ (or ‘Advanced search’) facility to locate them. You can choose model portfolios, discretionary fund manager portfolios, funds, or exchange traded instruments.
Important note: Cash is not available as an investable asset for the CIB.
Enter the asset allocation percentage split amongst the selected assets and ensure the total equals 100%.
Once you’ve entered the asset allocation, a risk score between 1 and 10 will be generated. There are however some exceptions and in some cases a risk score will not be generated.
7. The next screen allows you to review the information you have entered.
- Use the ‘Edit’ options to make any amendments.
8. Supporting documentation will be generated. These documents contain important pre-sale disclosure information for you to discuss with your client. You can consolidate the documentation into one file by selecting the documents you require and clicking the ‘Consolidate’ button.
9. Review the information, tick the declarations and when you are ready, click ‘Submit application’.
- You can save and exit at any stage, with the platform saving all entered information, up to the last fully complete page of the journey.
- The green banner at the top of the screen confirms your new business application has been submitted.
10. If you’ve chosen debit card as the payment method, continue to the payment stage by clicking ‘Proceed to payment’. You can choose to do this later from the client’s dashboard, however any delay will hold up the application.
Important Note: Please ensure that any trustees, beneficiaries, settlors and/or lives assured you wish to add to the bond, have been created as individual clients before starting the application.
Tip: when you have created your trustees, beneficiaries, settlors and/or lives assured, use the ‘Star’ icon to add them to your quick list, to make searching for them later, much quicker.
1. From the homepage search for the relevant client.
- For Trust clients, ensure that you have created the trust first with the appropriate trust details
2. Click on the ‘New business’ button at the top of the screen and select ‘New business application’.
3. Select the Collective Investment Bond and the adviser for the case and then complete the questions about the advice that’s been given and click next.
- This will include the LEI Code for the trust if applicable, to enable you to invest in Exchange Traded Investments.
- Add one of the trustees to the application by using the search field or by finding them from the quick list option.
4. Enter any remaining client details that have not already been provided. Information entered when initially setting up the client will have pulled through to the application.
- Confirm if your client wishes to apply “Capital Protected Death Benefit” to the bond.
- Add your lives assured at this stage by searching for them, or by using the quick list if you have added them previously.
- Choose the Relationship between the life assured and the bond holder from the drop down list.
- Click next.
5. On the next screen, enter details of any servicing fee that has been agreed with the client and how the investment is going to be funded (Client and/or Third Party Payment).
- If you intend phasing the investment into the assets, please select here and choose the period to phase over and the start date for the phasing, noting that phasing takes place on the 1st of each month.
- Enter the initial fee you have agreed with your client.
- The ‘Assumed holdings’ section allows you to include additional platform holdings (excluding this application) and the value of any linked accounts to enable the likely platform charge to be displayed within the illustration.
6. Select the assets to invest in using the ‘Search’ (or ‘Advanced search’) facility to locate them. You can choose model portfolios, discretionary fund manager portfolios and/or funds.
Important note: Cash is not available as an investable asset for the CIB.
- Enter the asset allocation percentage split amongst the selected assets and ensure the total equals 100%.
- Once you’ve entered the asset allocation, a risk score between 1 and 10 will be generated. There are however some exceptions and in some cases a risk score will not be generated.
7. The next screen allows you to review the information you have entered.
- Use the ‘Edit’ options to make any amendments.
8. Supporting documentation will be generated. These documents contain important pre-sale disclosure information for you to discuss with your client. You can consolidate the documentation into one file by selecting the documents you require and clicking the ‘Consolidate’ button.
9. Review the information, tick the declarations and when you are ready to do so, click ‘Submit application’.
- You can save and exit at any stage, with the platform saving all entered information, up to the last fully complete page of the journey
- The green banner at the top of the screen confirms your new business application has been submitted.
- Any supporting documentation can be sent to us. Although we do not need to see the signed adviser fee form at the time of application, it is important that you keep a signed copy of the form on your client’s record. We may request to see this as part of an audit or if we have a query relating to fees.
- You can review the progress of your application, and track any transfers, from the client’s dashboard.
The following are some tips to ensure your customer’s payments can be allocated to their account quickly and efficiently:
- Where a customer is contributing to their spouse’s account this should be keyed as a third party contribution. All the normal anti-money laundering checks will then be undertaken.
- Ensure the narrative accompanying the payment is clear and concise and where possible include the sub account number and full name (or Date of Birth if this is a new business application and sub-account isn’t known).
- Where possible reduce the number of payments for one application.
Setting up multiple products for your client?
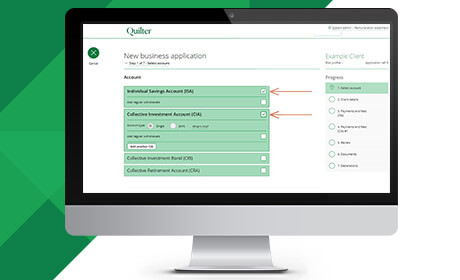
You can now include multiple products in new business applications and quotes, making it a quicker and more efficient process for new and existing clients looking to take out multiple products. Additional benefits include easy replication of fund selections and one consolidated fee form!
Platform support
Get instant access to online resources such as training videos and Q&As that will help with your daily tasks.